Class 9: Build the complete circuit and Program

Since the mission this week is to build the core, we had searched many many things on the Internet and met different problems and did many changes! The content in this documentation might be a little bit more.

# Name Number Note
1 Shanghaiuno board 1 Arduino UNO is OK too
2 Potentialmeter 5 The number is determined by you
3 Slient Buzzer 5 The number is the same as potentialmeter
4 Button 1 ###
5 LED light 2 Different colours
6 Wires Decided by you ###
7 Breadboard 1 ###

  • We have done a very simple circuit to realize playing some simple music such as Happy Song. Then, this is our core, we need to plus some more features on it. Actually, what I want to finally present is an effector, which can change the output frequency by control some types of input.

  • As the most suitable and simple adjuster(I don't want to use the distance sensor and some other sensors bacause it is not stable.), potentialmeter could be the one for my the circuit. By calculating its number of voltage and the frequency of inital sound, it can certainly change the sound.
  • Firstly, I only add one potentialmeter on my circuit and construct a program for one potentialmeter. The main code is
  • int add_val1 = -200+(int)(analogRead(A0)/2.5)
  • for (int x=0;x smaller than length;x++)
  • tone(outpin,tune[x]+add_val1)
  • The code above is realize the function that by rotating the potentialmeter you can change the sound of happy song! Forgiving me, I didn't take a picture of that, but there was a problem here, we had a very strange sound, and the most important thing was that the change wasn't very obvious. We spend a little time solving this stupid problem. Exactly because there was a delay, if we cancel the dealy, there is a continuous change and could be heard clearly.
  • Solving this problem, we continued our steps. Then, two potentialmeters are necesssary. The code is the same but add some simliar outputs in the program.
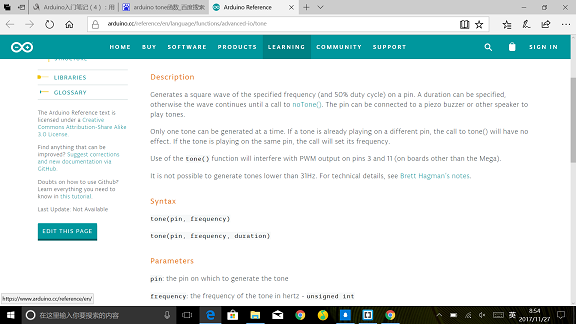
  • However, another problem come up, it can change the frequency at first when there is only one potentialmeter. When there are two potentialmeters, it cannot realize the function as we told before. The function is that we want to rotate different potentialmeters corresponding to each part of the waveform so that it can be a remixer. However, it can only give one sound which controlled by one potential, the other potentialmeter is useless. After dubugging for a long time, we ensure a problem existed in function tone().Then, we get some information.
  • After carefully reading the picture above, we know that the reason is function tone() in arduino can generate only one waveform once. It is impossible for tone() to generate two different waveforms at the same time.
  • No matter how the situation changes, we should stick it on! Remixer is the final goal. (Though we make a "Noisy board in the end.")We try to recover our program, the normal happy song must be stayed in the PCB. Since tone() cannot generate different waveform at the same time, what if I let it generate different waveforms one by one with a little delay. Therefore, we restructed the program again.


  • digitalWrite(7,HIGH);
    digitalWrite(4,LOW);
    while (digitalRead(2) == 0) {
    int add_val1 = -200 + (int)(analogRead(A0) / 2.5);
    int add_val2 = -200 + (int)(analogRead(A1) / 2.5);
    int add_val3 = -200 +(int)(analogRead(A2) / 2.5);
    int now_delay = (int)analogRead(A3) / 5;
    tone(outpin,800+add_val1);
    delay(now_delay);
    noTone(outpin);
    tone(outpin2, 1000+add_val2);
    delay(now_delay);
    noTone(outpin2);
    tone(outpin3,1200+add_val3);
    delay(now_delay);
    noTone(outpin3);
    }
    noTone(outpin);
    noTone(outpin2);
    noTone(outpin3);
    state = 1;
    }
    delay(500);
    }


  • A0,A1,A2,A3 are four inputs for the potentialmeters. The previous three potentialmeters used for changing three different frequencys. The last potentialmeter used for changing the delay, because when we test the effect of the remixer, it just change the frequency, a little bit boring. The most easiest way is to add the input which can control the delay. In term of the different delay, you can make many different effect from this small board.
  • Question

  • This is our final circuit.
  • Named "Noisy board", it is a shame to call it "Remixer", because the sound is too noisy, but you can consider it as a simple DJ board. When you open the project, it will first play the happy song. However, once you push the red button, the alarm light will light up , which alert you now this is noisy mode, and you can rotate the potentialmeters as you want, it will give many many different kinds of noisy bomb! You can use it to wake up your roommate when you must get up early to have a fabolab, but they can sleep until the end of the world!